Disclaimer: I am by no mean a professional. I am just doing this for fun and enjoy learning along the way (I probably still don’t know anything 🤣). These are not meant as a guide and should not be treated as such. What I am showing you here is what I did, and it worked for me and my situation but might not apply to you. Your result could be very different from mine. Heck, I could be doing or saying something entirely wrong since I’m still considering myself a newbie (Hence the name of my site “noob to networking” 😉). Please don’t take a random person’s words on the internet too seriously, and again, ALWAYS and I mean always do your own research (Well, take this one seriously, though).

Another week already? Wow, time does fly, doesn’t it—it is time for me to start writing or finishing up the post for this week. I apologize for breaking this up into multiple parts; however, I was run short for times last week and hoping to get something out. I know these are sounded like excuses because they really are 😅. I will try a bit harder to get back to the old routine and better at time management to have enough time to get the posts out. The keyword here is “try” so I’m not going to promise anything since I do not promise something I do not have the confidence I could keep 😝.
With that said, happy Monday to all of you. As promised during last week’s post, we will continue to go over the rest of the setup for my home network. Last time we talked about the internet gateway, which was pretty straightforward. I’m sure the majority of the average person probably won’t even notice about it when they have their internet service installed due to the ISP doing all the installation and configuration, so everything just “worked” right out of the box. Also, I realized for average users, wireless or (Wi-Fi) is the most popular way people use to access the internet as not many use a direct-wired connection. So I want to explain how my setup translated into your home network setup.
The “usual” network set up
So when you ordered internet services to be installed in your resident/business. The technicians will come by to your home and through coaxial TV cables or phone line, and occasionally fiber-optic (if you have this, just know you are fortunate) hooked them up into a box. That box will provide Wi-Fi, and all you need to do is connect to the Wi-Fi network they set up, and you will have access to the internet. That box, however, is not just 1 specialized device but more like 3 in one combo. It usually is a Modem, a router/firewall, and wireless access point all combined into one.
Typically, for average uses, there is not anything inherently wrong with it. It did what it was supposed to do, and the upside is that it is all in one, so it is a smaller footprint, easier to set up (there is not much to set up). The downside is that, well, since it is a combo 3 in one, they served the purposes of all 3 devices but did not do anything particularly well. It is the correct definition of “Jack of all trades, master of none.” This is why most power users usually opt out of specialized devices to perform a specific task well. I mean, sure, you go to a family doctor for a check-up, but you wouldn’t want them to perform surgery on you, would you? The same idea applies here. I want to have better control of my network and better-specialized devices for the tasks, so I do not use the combo and use each specialized device for its intended purposes. I have my Modem to communicate with the ISP. My Pfsense box is my router/firewall, and last, but not least, I have a dedicated wireless access point that handles all my Wi-Fi-connected devices and the wireless hotspot.
10 GbE backbone
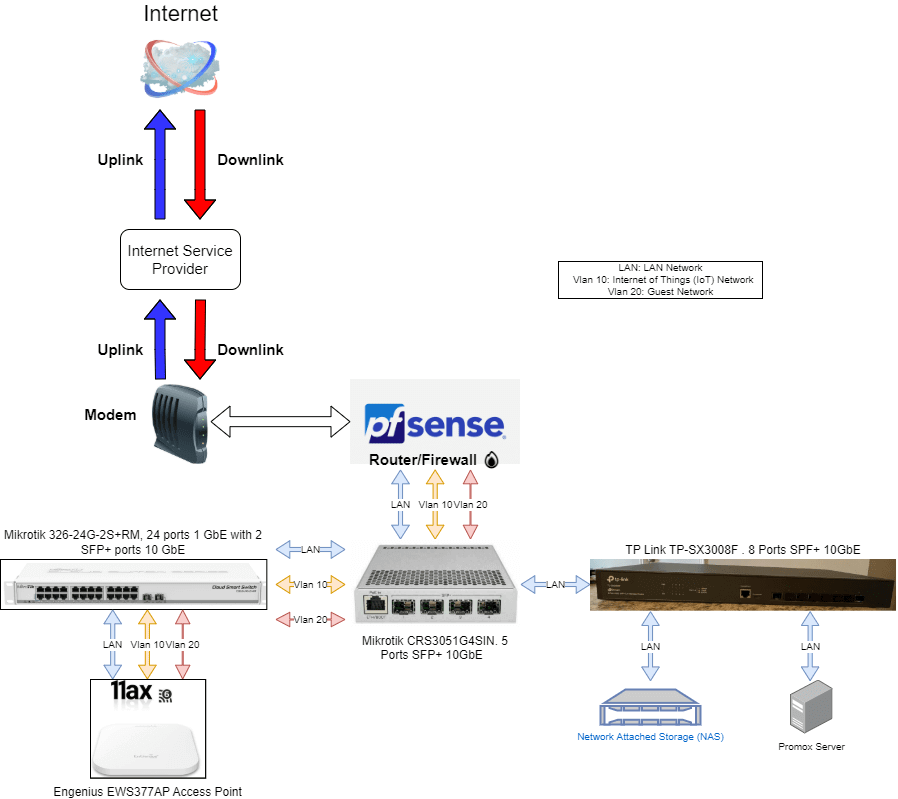
So after I have set up my internet gateway, which I could describe as facing outside the internet, now I want to configure my local network and how I want all my devices to be connected. Imagine living in a gated neighborhood, and the internet gateway is the gate that separates your neighborhood from the outside. The local network is the neighborhood. The houses inside the neighborhood are all the devices in your local network, while the street is the connection. The street connected all the houses and led to the gate. I want to make sure the street inside my neighborhood is big and smooth so that all the houses can talk to one another as efficiently as possible. Of course, it is not quite like that, but this is just an analogy for you to have the idea. I explained why I want a 10 Gbe backbone for my network to have more devices talk to each other at once without bandwidth limitation. The bandwidth is how big the street is in the case.
How do I do that?
I talked a bit of 10 GbE back in the post about my TP-Link switch. To have a 10 Gbe backbone, I need to have a network switch capable of handling 10 GbE. At first, I would use it as my backbone, but after some deliberation, I decided to go with this bad boy, the Mikrotik CRS3051G4SIN.

So what is special about this network switch? Well, I wouldn’t say it is special, but it could handle 10 Gbe, 5 SFP+ ports, and 1 RJ45 port for Pfsense to connect. The operating systems (I’m using the switchOS instead of routerOS) installed on this are clean and intuitive (for me at least) and handle Vlan well. The only downside I could think of is maybe you might want to have more SFP+ ports in the future, but well, it is not the devices’ fault and more of your poor planning. I connect this to my Pfsense box via RJ45 ethernet cable and have 4 extra ports that are 10 Gbe capable. You could say this is my central HUB that connects my entire network before the internet gateway. Oh, did I mention this switch is only $110? That is right, and this is a very affordable option for anyone who wishes to have a 10 GbE network without breaking a bank. So I guess this is switch is sort of remarkable after all 🤷♂️ at least to my wallet 😂.
I also learned that this switch plays nice with all my Vlans set up, and if I do not specify anything, all my Vlan traffic will pass through without any issues. I know some switches will drop the Vlan if we do not tell it otherwise, but hey, I did not have that many hands-on experiences with other switches, so I can’t tell. Pfsense is handling Vlans for the most part, so that I won’t talk about it here, but I will post on how I set up my VLAN network in the future.
For now, you only need to know I have 3 separate networks. The first one is the LAN, Vlan 10, and Vlan 20. In case you don’t know, most of the time, when people only have 1 LAN network, it is Vlan1, but we call it LAN anyways, so I am just going to keep the naming convention to prevent further confusion. So my LAN network is my primary network where I have all my devices, NAS, and servers connected. There is not much of a restriction for the LAN network. The second network is Vlan 10, my Internet of things (IoT) network. This will be used for all the smart home devices around the house, such as smart lights, smart cameras, smart doorlock… I created this network so that I can give these devices access to the internet (most of them require the internet to function), but I also do not want them to be able to access my servers and my LAN networks. Thus I have them all in their own little isolated network where they can talk to each other but not my LAN, where I have all my personal devices, information, and data.
LAN 10 GbE network set up

I’m sure you probably are familiar with this TP-link switch. I wrote a post on how I factory reset it. What role do you think this switch will play in my home network setup. Well, you see, I do have a few servers and NAS that could take advantage of the 10 GbE network, so I decided I would use this switch for the central switch for my servers and homelab. That way, data follow through them will be handled by this switch, and most of the time, it will be only between my internal servers and rarely go out. Thus, only 1 connection of 10 GbE to the Hub switch will suffice. The ideal is to have a 10 GbE connection between all my switches throughout my home network at all times. Using the diagram I drew for my home network setup, you can see how this was set up. It is hard to explain more since I think it is relatively self-explanatory. Of course, since these are SFP+ ports, I will need to have corresponding cables and network cards suitable for this. I do have SFP+ transceivers modules and fiber optic cables for long-distance. I also have Direct Attach Copper (DAC) cables for a short distance.
Wireless and Vlan network
For wired LAN networks, I prioritize speed and reliability. Also, because most of the devices on my LAN network are server and NAS thus, they could take full advantage of having 10 GbE connections since there will be a lot of file transfers and exchanges, and I do not want to saturate my connections. But for everything else, 10 GbE is not a need, and it is not like they could take advantage of 10 GbE anyways due to the standard ethernet ports are usually 1 GbE, so having 10 GbE go there does not make much sense, plus it gets expensive if I want to convert them to 10 GbE. So my design is to have a network switch with SFP+ 10 GbE uplink to the backbone switch while providing multiple 1-gigabit ethernet ports for my uses. That way, multiple devices on gigabit ports will still communicate with my NAS and servers at full capacity and not worry about the connection being saturated. You can imagine this as a tree branch connected to a tree trunk or multiple small streets all connected to the main street; the main street will be able to handle traffic coming from at 10 streets before it becomes crowded (10 GbE and 1 GbE in case the analogy was lost on you 😛). This is the balance between cost and performance I was looking for. And I found the perfect fit for my requirements (well, sort of).

If you have not realized it by now, I have quite a few Mikrotik products in my setup. Why? Well, because they are what I consider the best bang for the buck. Specifications vs. prices. Compared to other network solutions, this one by far offered the best prices to performance, and since I am cheap, this is my go-to solution. I was debating other manufacturers, but in the end, the prices and what I got by Mikrotik beat all the competitors. With that said, I’m sure everyone values something differently, so this is a very subjective opinion of mine since I believe others have their own advantage. But if you ask me, I would say for me personally, I will go with Mikrotik (this is not a sponsor, by the way). However, one of the things that mildly annoyed me was how long Mikrotik named their product. I understand the name showed all the features set as 24G = 24 ports 1 GbE and 2S+ = 2 SFP+ ports but seriously, though? Could you not come up with some better naming schemes? Not that many people need to know all the specifications from the just name you know? We don’t hear iPhone 6.1XDR-A14-64GB, do we? We called it iPhone 12 😂.
With all my minor annoyance aside, I am happy with this switch since it only cost me 150$ but offered so much in terms of features. It is a fully managed switch, plays nicely with my VLAN config, and is relatively easy to use, so I really do not have that many complaints. 24 x 1 GbE network ports and 2 SFP+ 10 GbE uplink is precisely what I was looking for.
Wireless network
All the talk about wired connection, what about wireless? I got you. So I did mention how I want the specialized device to handle its specific task. I decided to go with a bit more enterprise solution for the wireless network than the home solution. Generally, for the home solution, the commercial routers you have will also act as your wireless access point or Wi-Fi, and they did their job pretty well to a certain point. One issue that does not match what I have envisioned for my home network was. First, I used Pfsense as my router, so the router functions of the commercial router are useless. They do have access points(AP) mode that makes them strictly serve as a wireless hotspot. However, I found that most router in AP mode is terrible as the performance loss is huge (Theoretically, it should work, but I do not know how when it is in AP mode, the speed drops dramatically). Another issue is with the number of wireless hotspots one AP can broadcast (the answer usually is one). Still, for my case, since I have 3 networks, I would like to have 3 separate networks being broadcast simultaneously. Therefore, the solution is a dedicated AP device whose job strictly is to broadcast the wireless network. In the end, I settle with this AP.

This is EnGenius EWS377 wireless access Point. I’m sure not that you heard of this because they are primarily used in the small business and enterprise network rather than home. What a baller I am 😎. This is a 4 by 4 antenna array, which means there are 4 antennas for sending (Tx) and 4 for receiving (Rx). It also has the latest IEEE 802.11 ax (or Wi-Fi 6). In short, it ticked all the boxes I was looking for in an AP. Even though the price is a bit high at $199, I still think it is a worthy investment for my home network; considering how many smart devices I will be integrating into my home, having a reliable AP is necessary. I have been using this AP for about 3 weeks now, and so far, it is great. I wouldn’t say I liked how to cut costs, they did not even include the power adapter and probably assume that you have either a Power over Ethernet (PoE) switch or PoE injector to power the devices. I would not mind them including a power adapter inside the package, but well, it is what it is 🤷♂️ .
Conclusion
Few, that was a lot to take in, huh. At least how you can look at the diagram and relate to how I designed my network and my thought process at the time. Of course, this is by no mean a perfect design nor optimal. This design worked for me and achieved what I had in mind while not making me homeless. Networking equipment is expensive, I’m telling you. If you don’t believe me, just google it yourself and see that I was not kidding. Overall I managed to have my entire network set up 10 GbE backbone for under $700, and that is an excellent price for what I get. Of course, your definition of affordable will vary from person to person, but it is a satisfying result to me.
Of course, this is by no means without the flaw. Since I put bunches of random networking equipment together, there are, of course, some compatibility and require a lot of manual configuration, which means you sort of have to have a basic understanding of networking and what you are doing. Of course, When I said I am a noob at networking, it was not entirely true because I still have some understanding of networking after hands-on learning and researching. I understand the attractiveness of other options such as Ubiquity Unify or TP-Link Omada because the user interface designs are very beautiful and easy to understand for the average user without that big of a learning curve. You get what you are paying for and what is considered valuable to you. For me is the prices vs. performance but maybe for you is the ease of use 🤷♂️. I had a lot of fun putting together my home network, and the hands-on working experience is valuable for me to develop further as I continue my networking journey. You can see my thought process and where I am coming from. Maybe you will learn what you should not do 😂.
Thank you for your time if you make it this far, and I hope this has been entertaining. I will put the Amazon-affiliated link of all the networking equipment I mentioned in this post down below in case you want to take a look at them. With that said, that is all the time I have to write for this week. Have a wonderful week, until next week.
-Laz
Amazon Affiliate Link
- Pfsense: I used a old office desktop but if you just started then I suggest you can get a mini PC with 2 or more network ports on amazon. I can link you a fews if you want to take a look HERE.
- Mikrotik CRS3051G4SIN HERE
- TP-Link SX3008F – HERE
- Mikrotik CSS-24G-2S+RM – HERE
- EnGenius EWS377 AP – HERE
- You will probably need a PoE injector to powered the Engenius AP. HERE.
- Direct Copper Attach (DAC) Cables HERE
- Fiber optic Cables HERE
- SFP+ module HERE
- SFP+ network card HERE For SFP+ network card. I would suggest you go to Ebay and get a used one from demcomissioned enterprise networking company, you will be able to get one for about $15-30 rather than buying new on amazon just FYI 😉
- RJ45 Network card HERE. Again, you will find a better deal on ebay for this in the used section, the price could be as low as $15.
6 responses to “How I set up my home network Part 2.”
Hey There. I discovered your blog the use of msn. That is an extremely neatly written article. I will make sure to bookmark it and return to learn more of your useful info. Thank you for the post. I抣l definitely comeback.
Thank you for being so supportive. Please let me know if you have any questions or want me to cover any topics.
I don’t think the title of your article matches the content lol. Just kidding, mainly because I had some doubts after reading the article. https://www.binance.com/ru/register?ref=O9XES6KU
Thanks for sharing. I read many of your blog posts, cool, your blog is very good.
Your point of view caught my eye and was very interesting. Thanks. I have a question for you.
Thanks for sharing. I read many of your blog posts, cool, your blog is very good.